> ## Documentation Index
> Fetch the complete documentation index at: https://qovery-feat-cpu-limit-disable-override.mintlify.site/llms.txt
> Use this file to discover all available pages before exploring further.
# VPC Peering
> How to peer a Qovery VPC with an existing VPC on AWS
## Overview
This guide shows you how to set up VPC peering between a Qovery-managed cluster VPC and an existing VPC in your AWS account.
## Goal
Connect an existing VPC on AWS accounts with the Qovery managed cluster VPC to deploy applications using resources like PostgreSQL RDS instances in the existing VPC.
## Prerequisites
* An existing AWS VPC with accessible resources (e.g., RDS database)
* A Qovery cluster already deployed on your AWS account
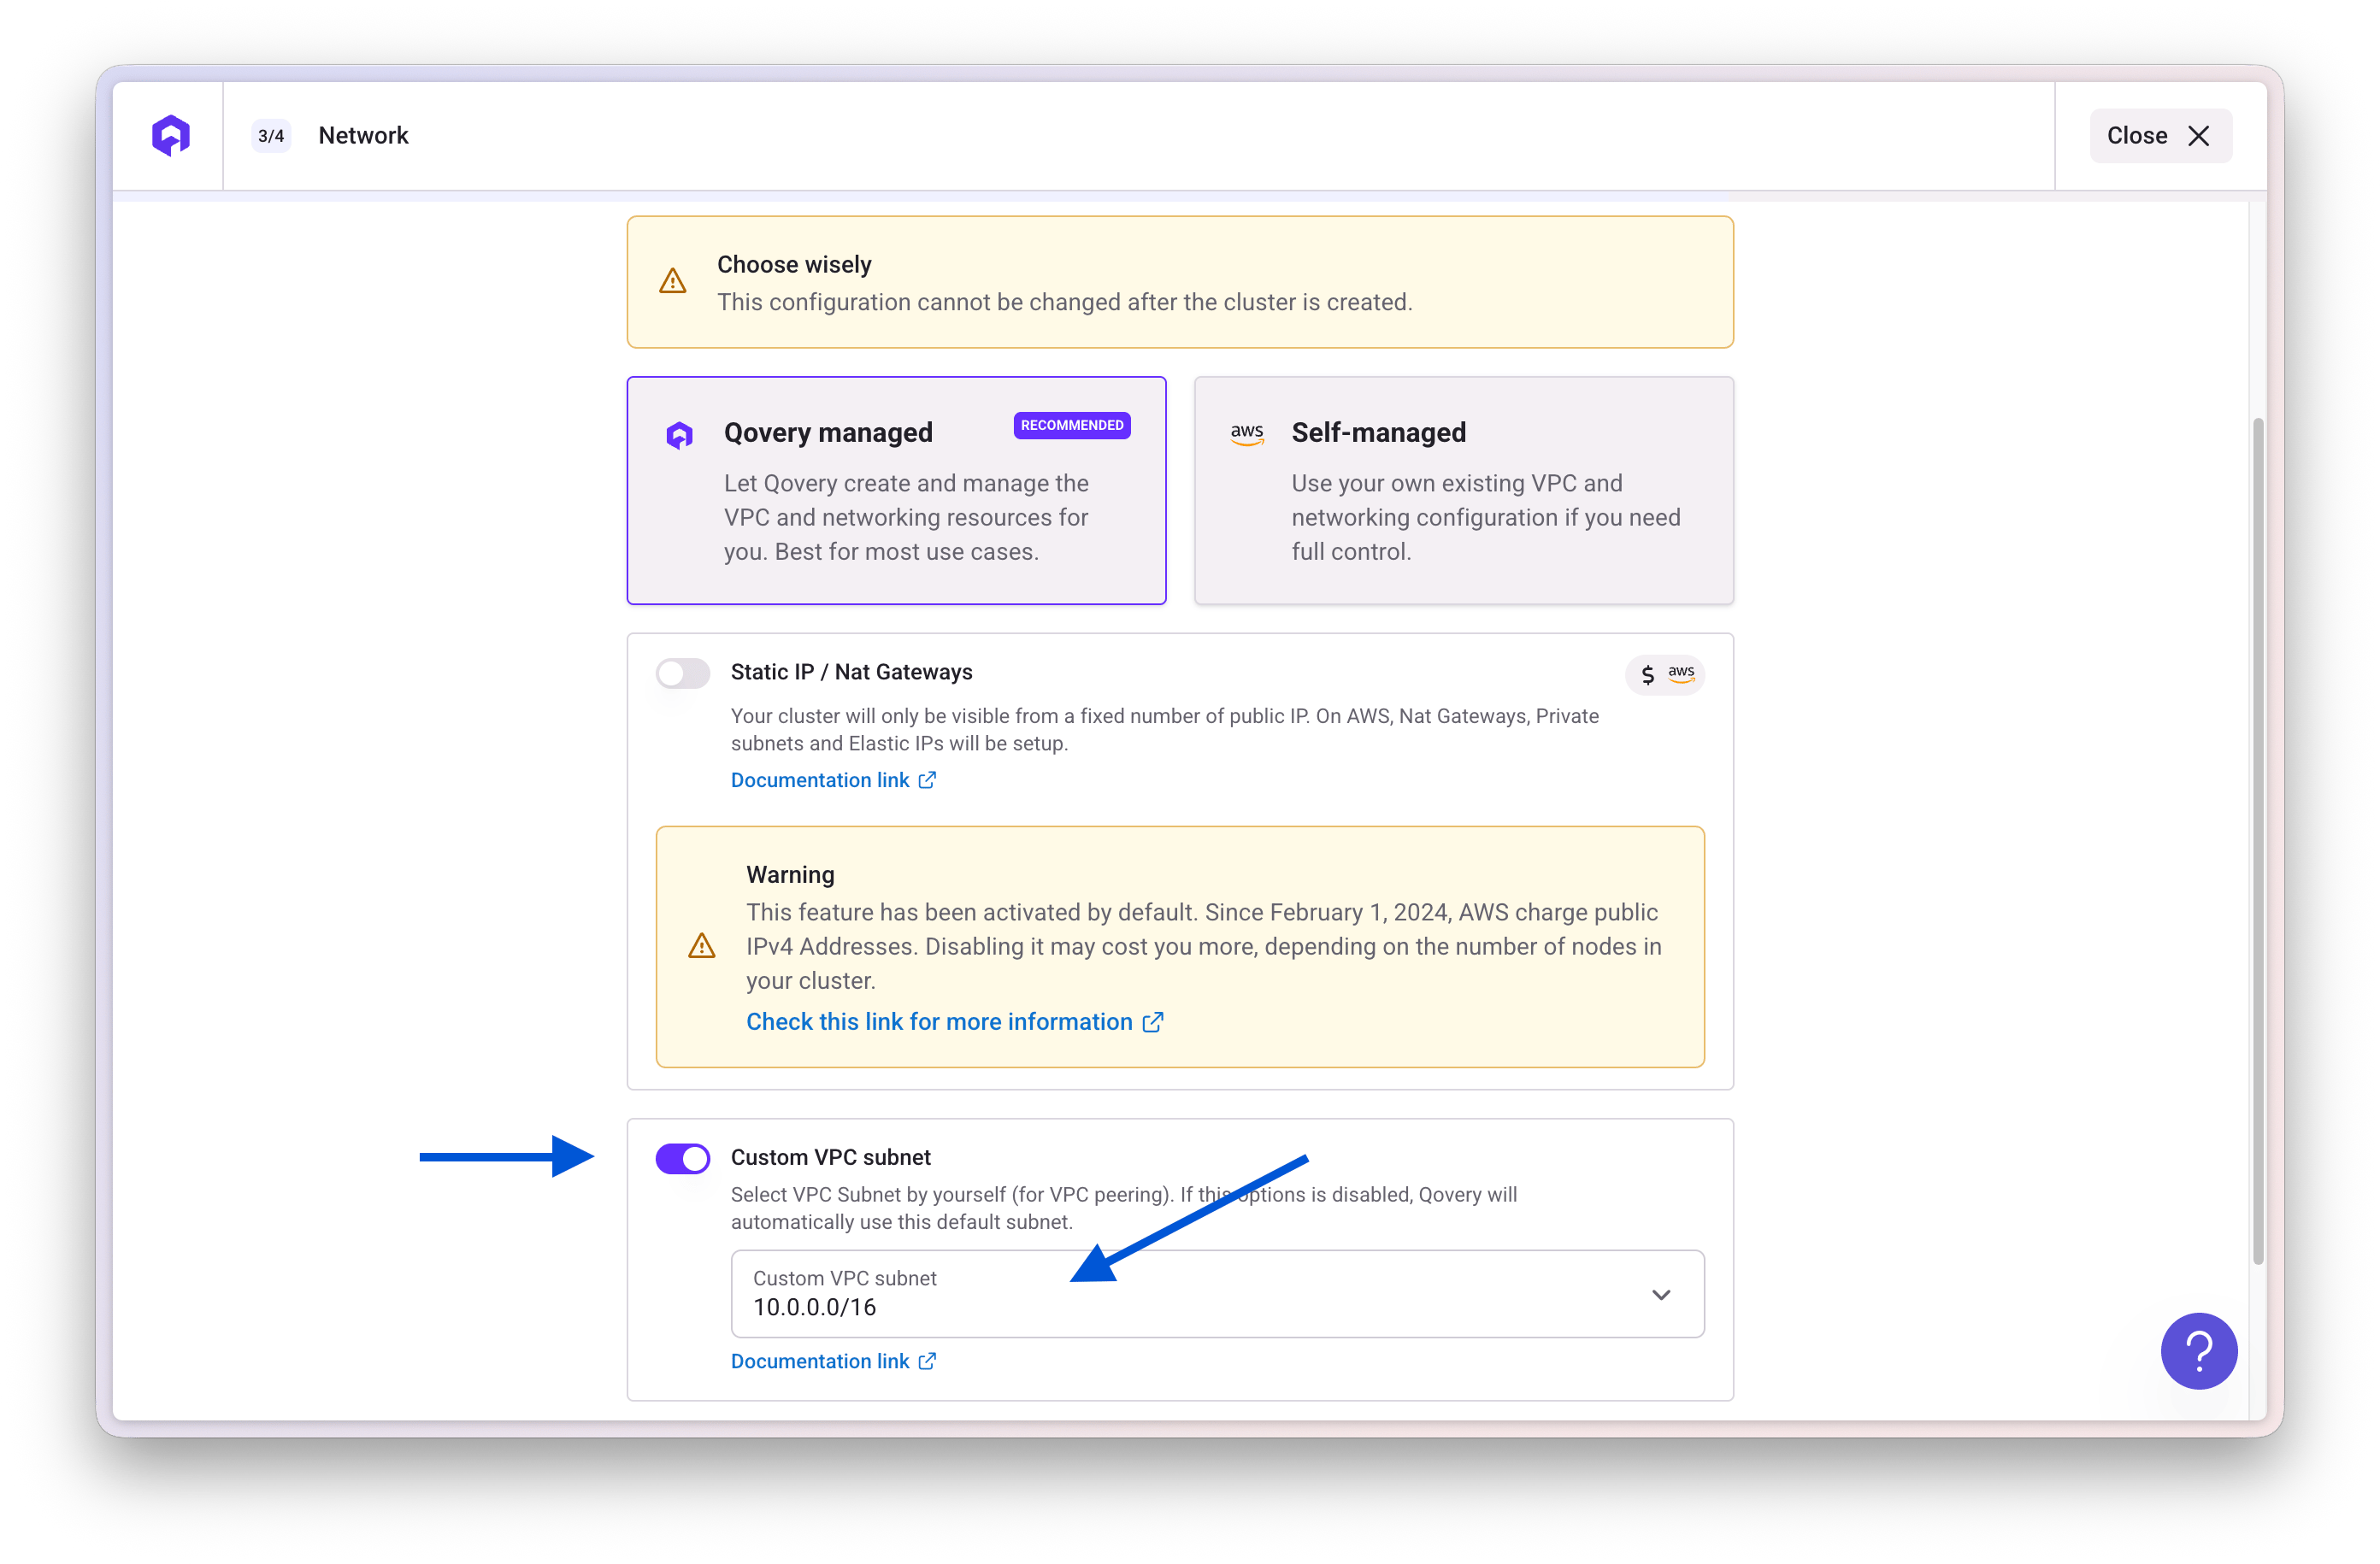
* Non-overlapping CIDR blocks between VPCs
Make sure the CIDR blocks of your two VPCs don't overlap.
You can customize the Qovery CIDR during cluster creation.
 ## Step 1. Gather the necessary information
You need to collect the following information:
| Information | Description | Example |
| ------------------------ | ------------------------------- | -------------------- |
| **VPC Source CIDR** | CIDR block of your existing VPC | 10.0.0.0/16 |
| **VPC Source ID** | VPC ID of your existing VPC | vpc-0abc123def456789 |
| **VPC Destination CIDR** | CIDR block of Qovery VPC | 10.1.0.0/16 |
| **VPC Destination ID** | VPC ID of Qovery VPC | vpc-0xyz789abc123456 |
### Find your existing VPC ID
In the AWS Console, go to **VPC** → **Your VPCs**
## Step 1. Gather the necessary information
You need to collect the following information:
| Information | Description | Example |
| ------------------------ | ------------------------------- | -------------------- |
| **VPC Source CIDR** | CIDR block of your existing VPC | 10.0.0.0/16 |
| **VPC Source ID** | VPC ID of your existing VPC | vpc-0abc123def456789 |
| **VPC Destination CIDR** | CIDR block of Qovery VPC | 10.1.0.0/16 |
| **VPC Destination ID** | VPC ID of Qovery VPC | vpc-0xyz789abc123456 |
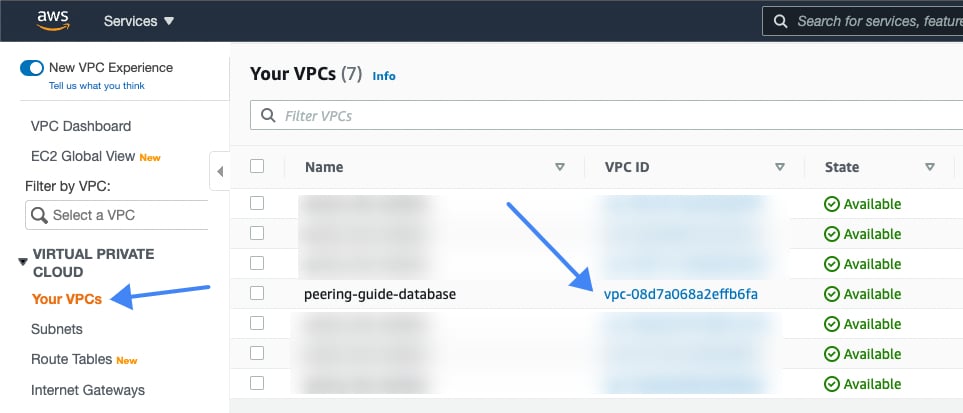
### Find your existing VPC ID
In the AWS Console, go to **VPC** → **Your VPCs**
 ### Find the CIDR ranges
Make sure the CIDR blocks don't overlap.
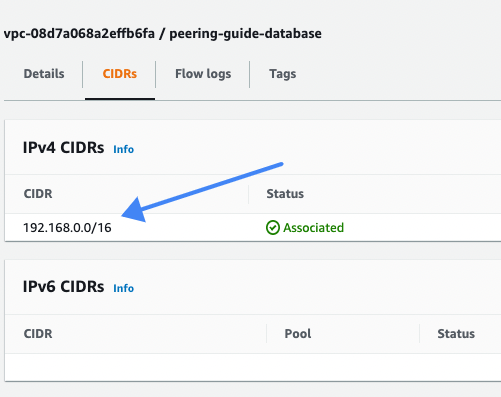
### Find the CIDR ranges
Make sure the CIDR blocks don't overlap.
 ## Step 2. Create a peering connection
In the AWS Console:
1. Go to **VPC** → **Peering connections**
2. Click **Create peering connection**
3. Configure the peering connection:
* **Peering connection name**: Give it a descriptive name
* **VPC (Requester)**: Select your **Qovery VPC**
* **Account**: Select **My account**
* **Region**: Select **This region**
* **VPC (Accepter)**: Select your **existing VPC**
4. Click **Create peering connection**
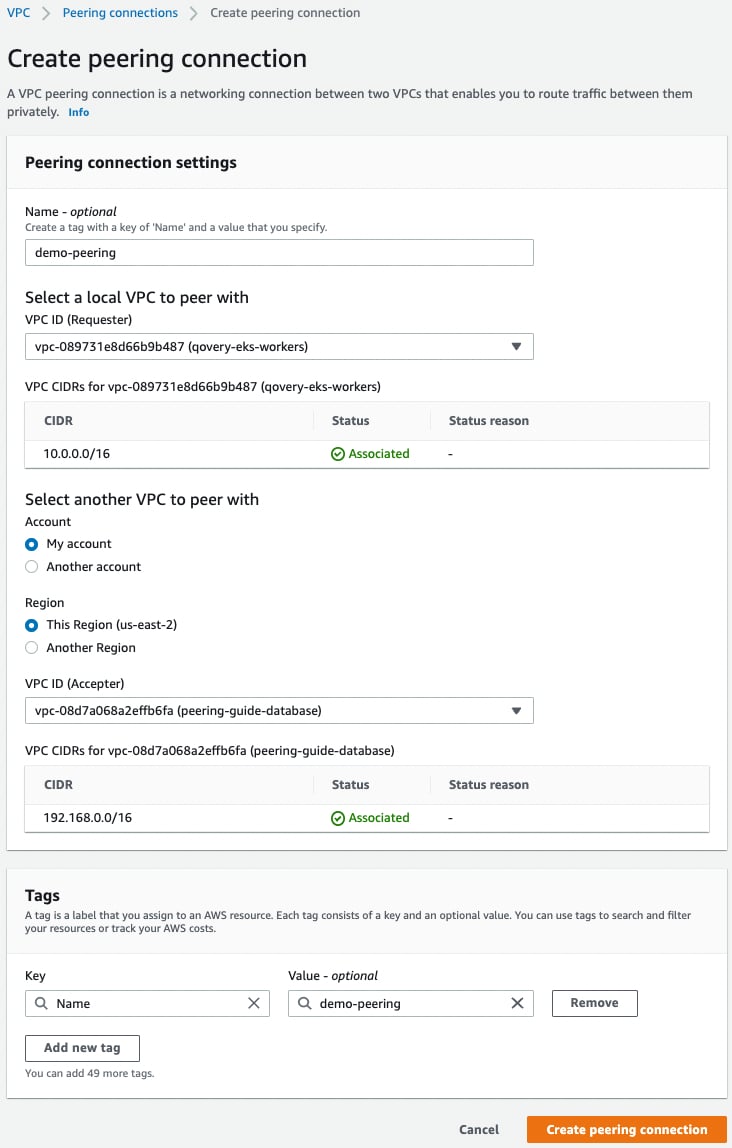
## Step 2. Create a peering connection
In the AWS Console:
1. Go to **VPC** → **Peering connections**
2. Click **Create peering connection**
3. Configure the peering connection:
* **Peering connection name**: Give it a descriptive name
* **VPC (Requester)**: Select your **Qovery VPC**
* **Account**: Select **My account**
* **Region**: Select **This region**
* **VPC (Accepter)**: Select your **existing VPC**
4. Click **Create peering connection**
 ## Step 3. Accept the peering request
1. In the Peering connections list, find your newly created peering connection
2. Select the peering connection
3. Click **Actions** → **Accept request**
## Step 3. Accept the peering request
1. In the Peering connections list, find your newly created peering connection
2. Select the peering connection
3. Click **Actions** → **Accept request**
 4. Confirm by clicking **Accept request**
The peering connection status should change to **Active**.
4. Confirm by clicking **Accept request**
The peering connection status should change to **Active**.
 Note down the **Peering connection ID** (e.g., `pcx-0abc123def456789`) - you'll need it for the next steps.
## Step 4. Update existing VPC route table
Now you need to add a route in your existing VPC's route table.
1. Go to **VPC** → **Route Tables**
2. Find and select the route table associated with your **existing VPC**
3. Click the **Routes** tab
4. Click **Edit routes**
5. Click **Add route**
6. Configure the new route:
* **Destination**: Enter the **Qovery VPC CIDR** (e.g., `10.1.0.0/16`)
* **Target**: Select **Peering Connection**, then select your peering connection
7. Click **Save changes**
Note down the **Peering connection ID** (e.g., `pcx-0abc123def456789`) - you'll need it for the next steps.
## Step 4. Update existing VPC route table
Now you need to add a route in your existing VPC's route table.
1. Go to **VPC** → **Route Tables**
2. Find and select the route table associated with your **existing VPC**
3. Click the **Routes** tab
4. Click **Edit routes**
5. Click **Add route**
6. Configure the new route:
* **Destination**: Enter the **Qovery VPC CIDR** (e.g., `10.1.0.0/16`)
* **Target**: Select **Peering Connection**, then select your peering connection
7. Click **Save changes**

 Do not edit or remove existing routes to avoid service interruption.
## Step 5. Update Qovery VPC route table
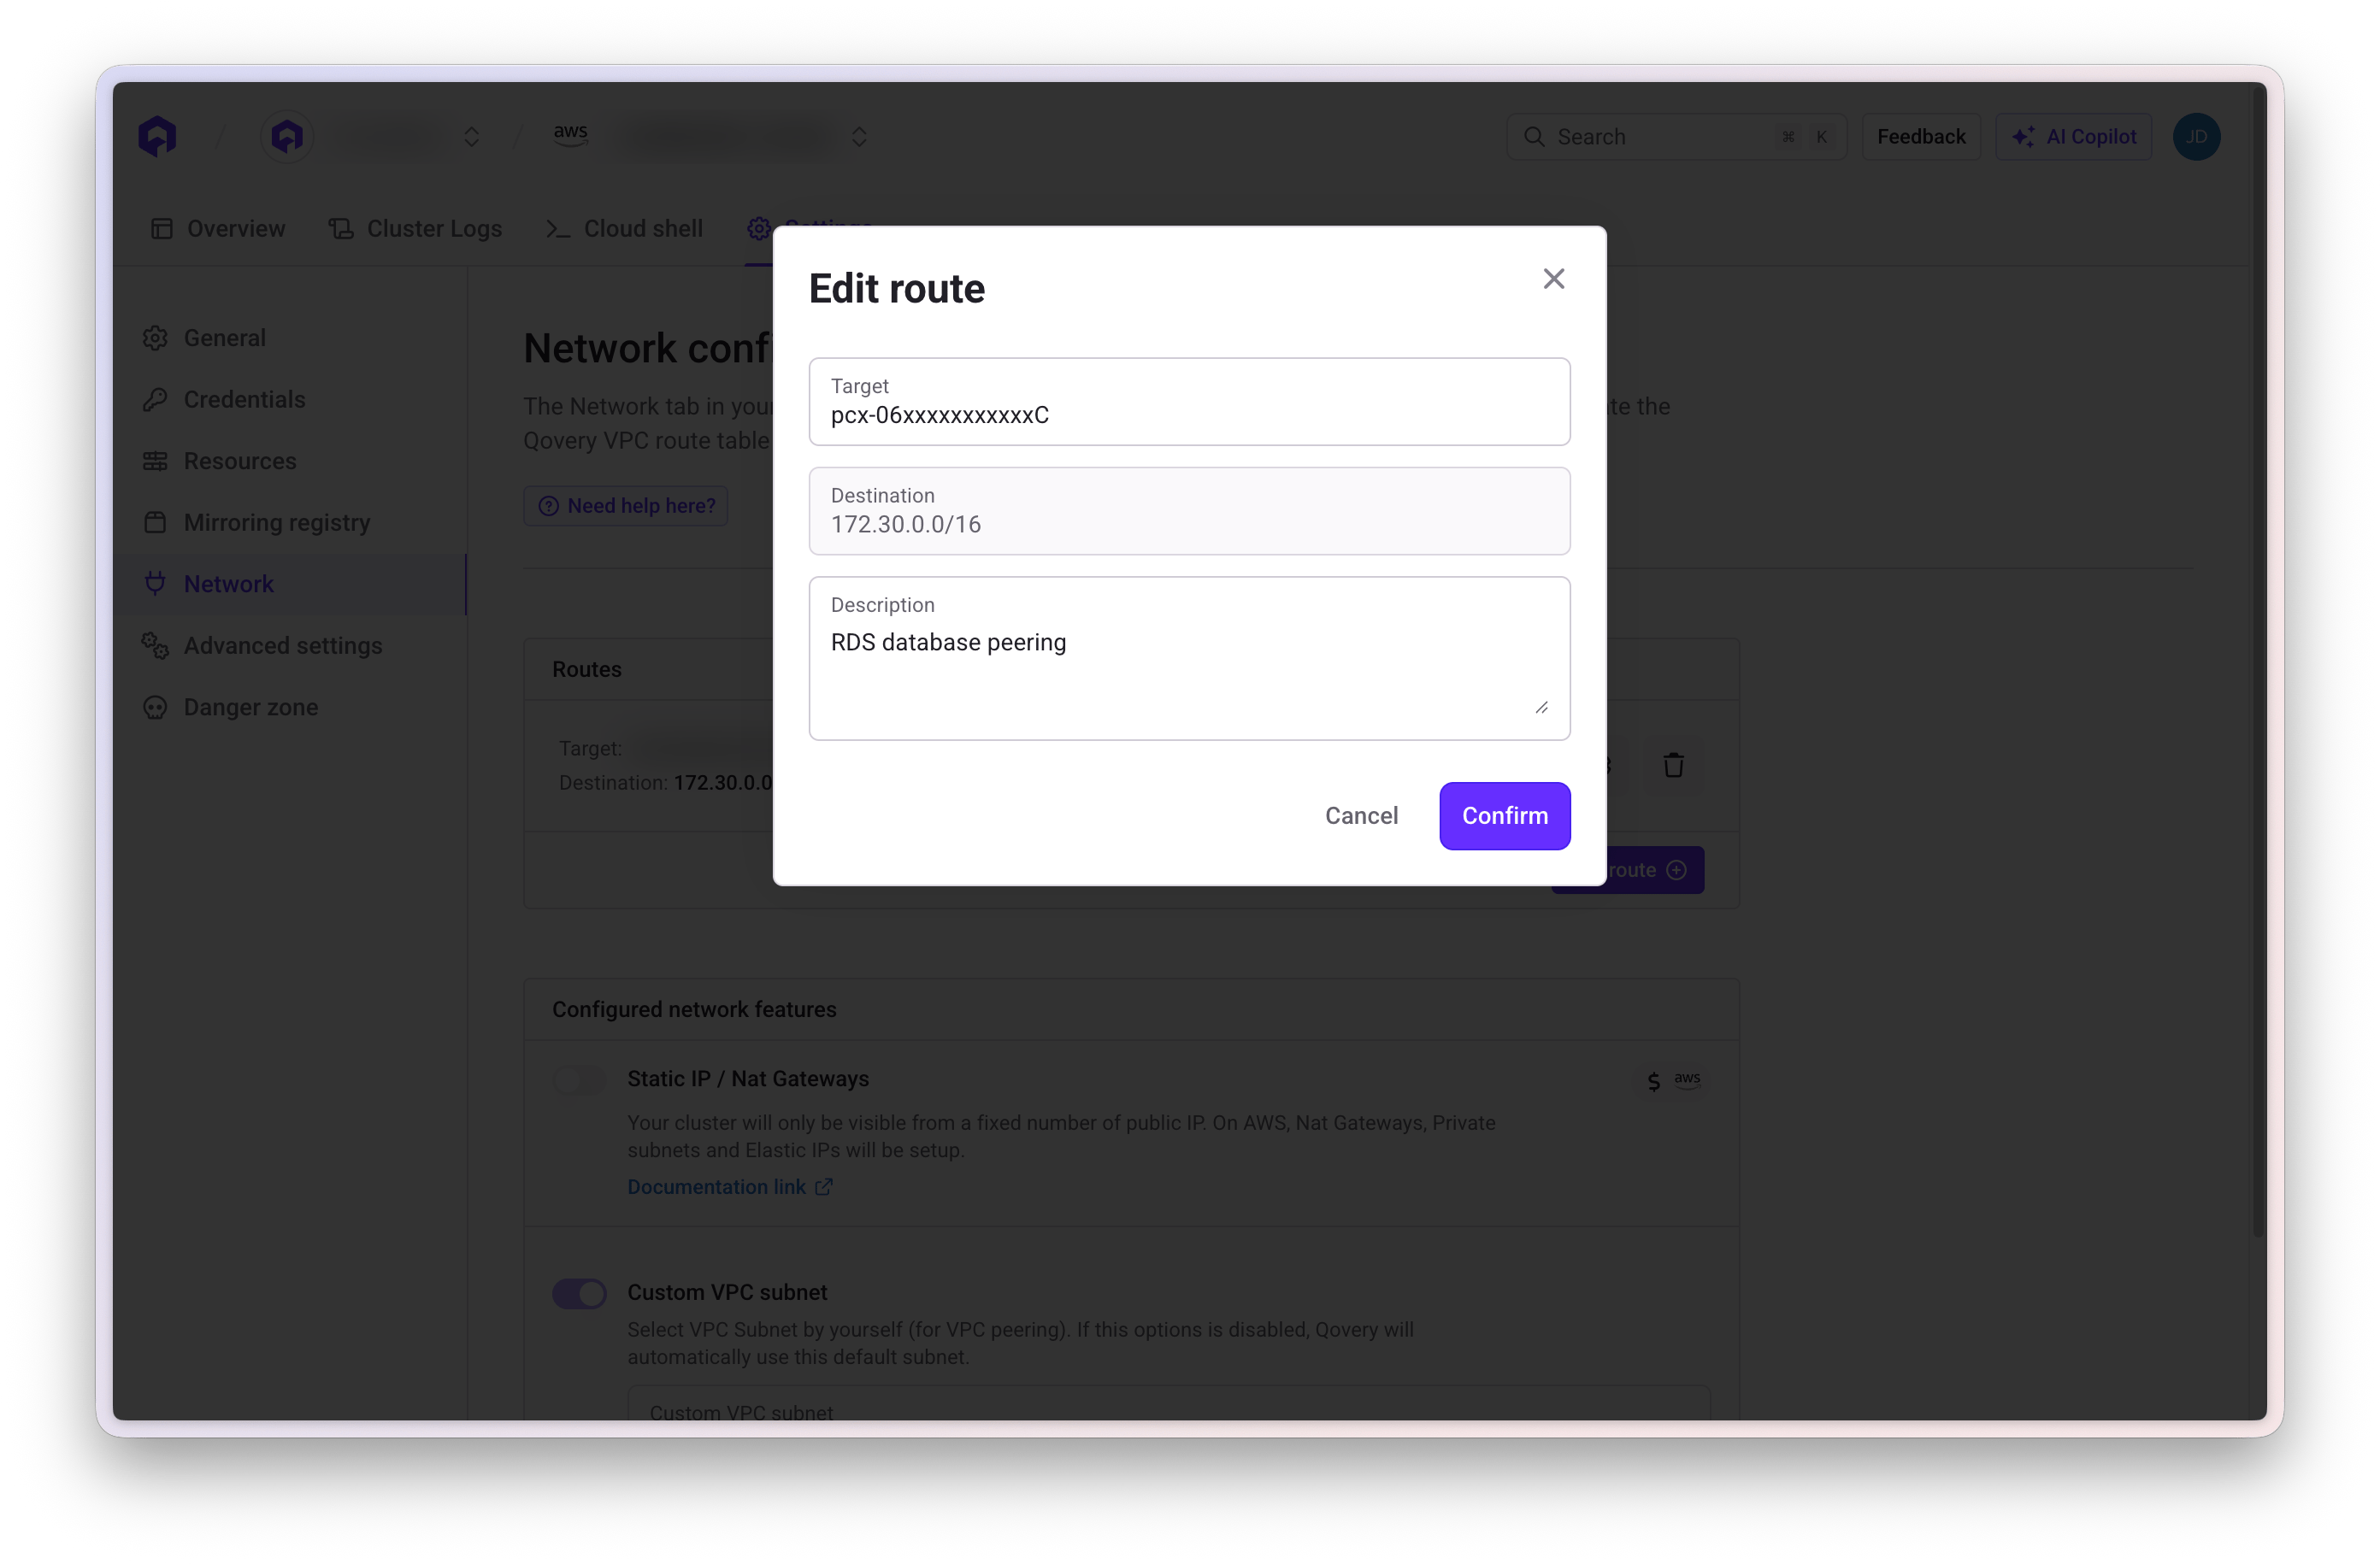
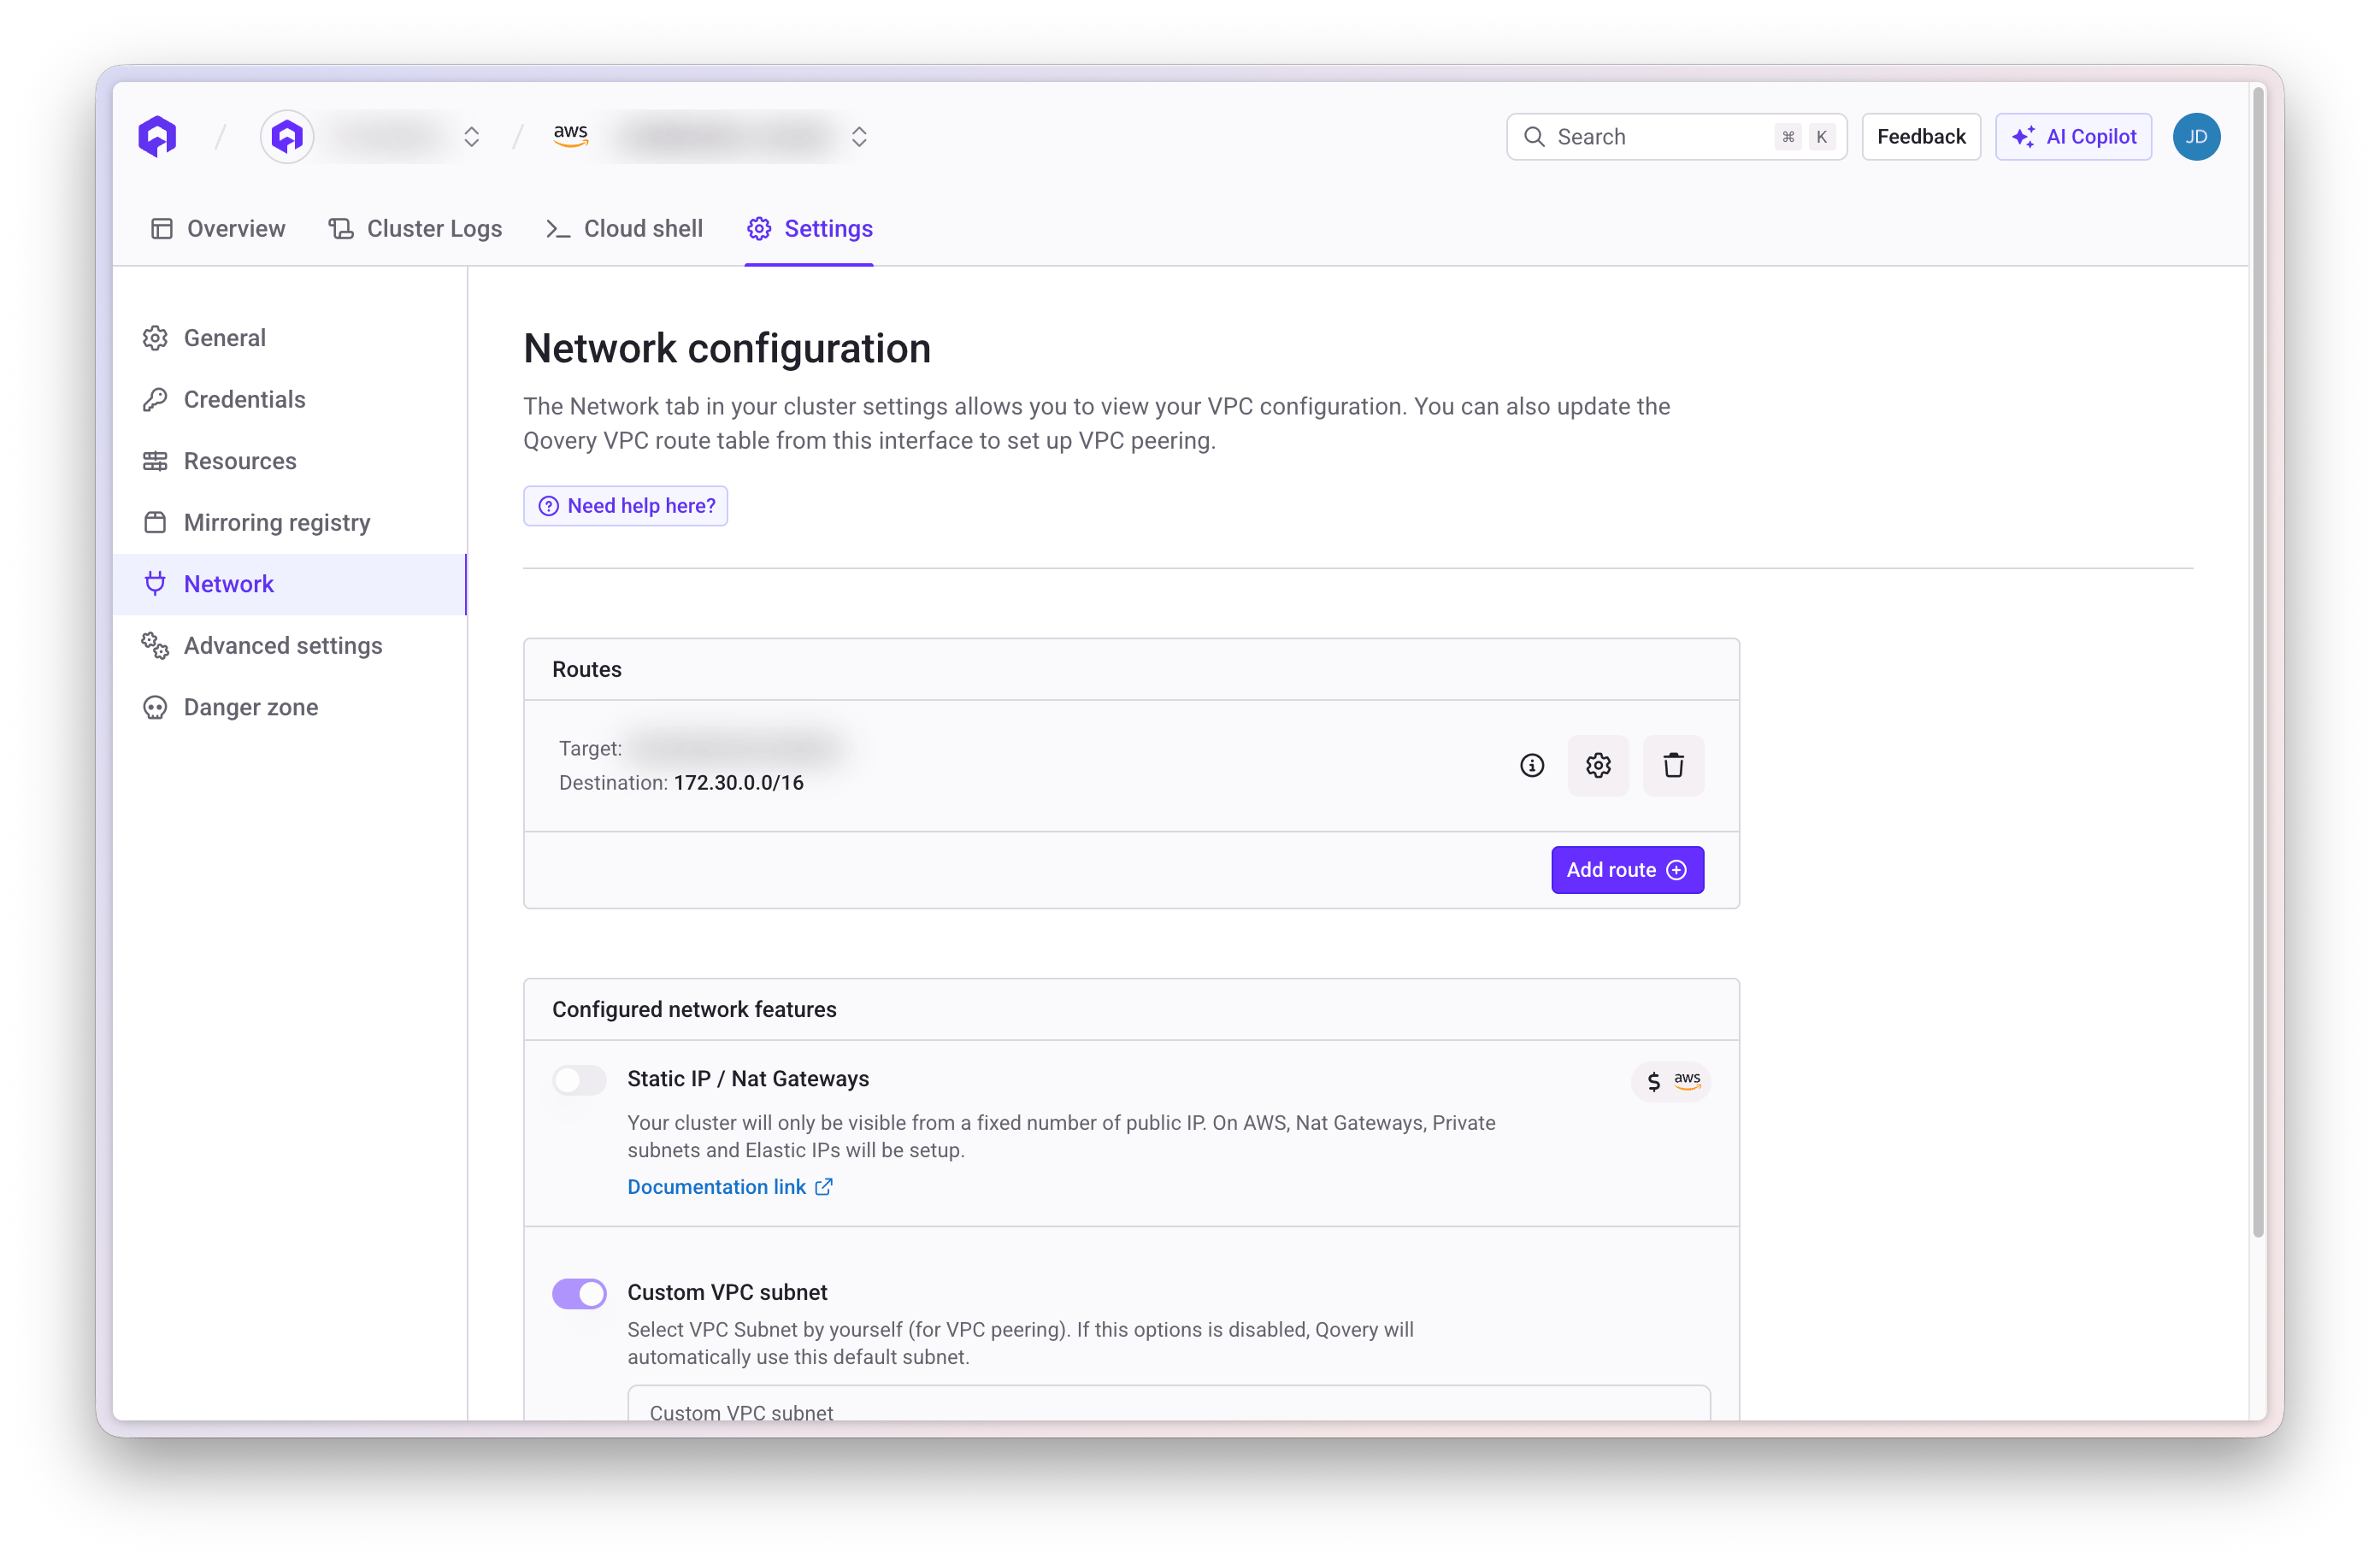
Add a route in the Qovery VPC through the Qovery Console.
1. Navigate to [Qovery Console](https://console.qovery.com)
2. Select your **Organization**
3. Go to **Clusters**
4. Select the cluster connected to the VPC you want to peer
5. Click on the **Settings** tab
6. Navigate to the **Network** section
7. Add a new route:
* **Destination**: Enter your **existing VPC CIDR** (e.g., `10.0.0.0/16`)
* **Target**: Enter your **peering connection ID** (e.g., `pcx-0abc123def456789`)
* **Description**: Add a description like "Peering to existing VPC"
8. Click **Save**
Do not edit or remove existing routes to avoid service interruption.
## Step 5. Update Qovery VPC route table
Add a route in the Qovery VPC through the Qovery Console.
1. Navigate to [Qovery Console](https://console.qovery.com)
2. Select your **Organization**
3. Go to **Clusters**
4. Select the cluster connected to the VPC you want to peer
5. Click on the **Settings** tab
6. Navigate to the **Network** section
7. Add a new route:
* **Destination**: Enter your **existing VPC CIDR** (e.g., `10.0.0.0/16`)
* **Target**: Enter your **peering connection ID** (e.g., `pcx-0abc123def456789`)
* **Description**: Add a description like "Peering to existing VPC"
8. Click **Save**
 Do not alter existing routes.
## Step 6. Update the security groups
Update the security groups to allow traffic between the two VPCs.
1. Go to **VPC** → **Security Groups**
2. Find the security group associated with the resources you want to access from Qovery (e.g., RDS database security group)
3. Click the **Inbound rules** tab
4. Click **Edit inbound rules**
5. Click **Add rule**
6. Configure the rule based on your needs
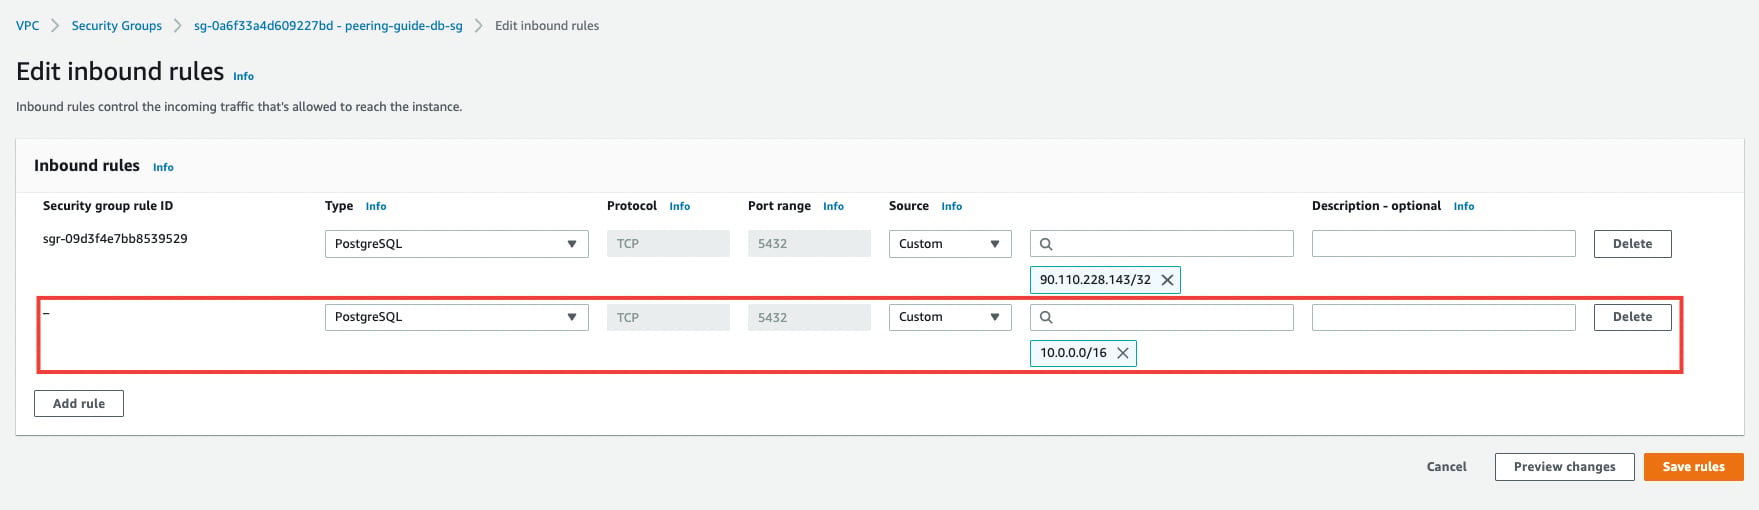
**Example for PostgreSQL database:**
* **Type**: PostgreSQL
* **Port range**: 5432
* **Source**: Enter the **Qovery VPC CIDR** (e.g., `10.1.0.0/16`)
* **Description**: "Access from Qovery VPC"
7. Click **Save rules**
Do not alter existing routes.
## Step 6. Update the security groups
Update the security groups to allow traffic between the two VPCs.
1. Go to **VPC** → **Security Groups**
2. Find the security group associated with the resources you want to access from Qovery (e.g., RDS database security group)
3. Click the **Inbound rules** tab
4. Click **Edit inbound rules**
5. Click **Add rule**
6. Configure the rule based on your needs
**Example for PostgreSQL database:**
* **Type**: PostgreSQL
* **Port range**: 5432
* **Source**: Enter the **Qovery VPC CIDR** (e.g., `10.1.0.0/16`)
* **Description**: "Access from Qovery VPC"
7. Click **Save rules**
 ## Step 7. Deploy an application
Deploy an application in your Qovery environment that connects to a resource in your existing VPC.
Make sure your application is configured with the correct connection details to access resources in the peered VPC.
## Next Steps
Official AWS VPC peering documentation
Deploy your first application on Qovery
Learn about cluster configuration
Security and compliance
## Step 7. Deploy an application
Deploy an application in your Qovery environment that connects to a resource in your existing VPC.
Make sure your application is configured with the correct connection details to access resources in the peered VPC.
## Next Steps
Official AWS VPC peering documentation
Deploy your first application on Qovery
Learn about cluster configuration
Security and compliance